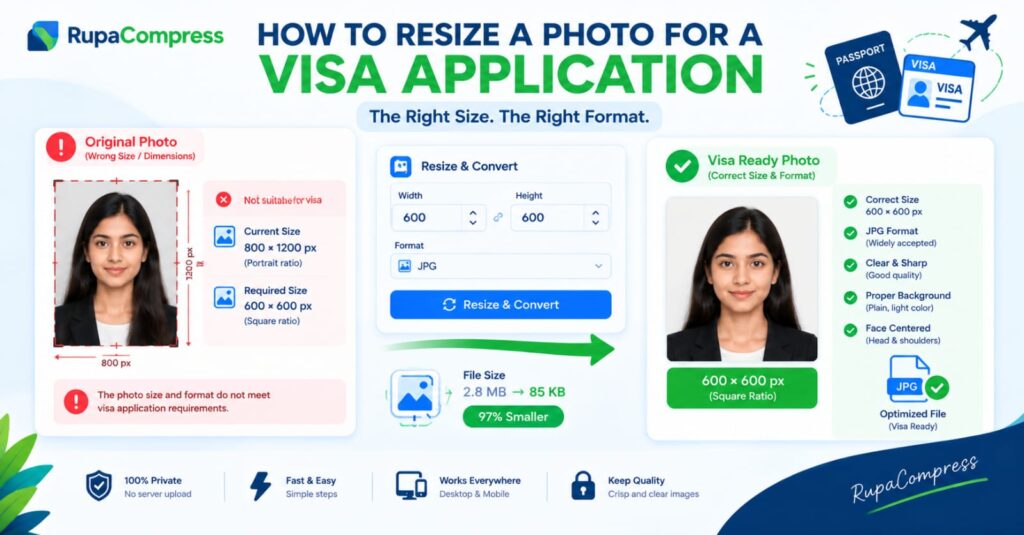
Planning an international trip, applying for a student visa, or preparing documents for an overseas job can be an exciting experience. However, the process can quickly become stressful when an online visa application rejects your photograph because it does not meet the required specifications. You might spend hours completing personal information, passport details, travel plans, and employment history, only to discover that your photo cannot be uploaded at the final stage. This problem is more common than many applicants expect because smartphone photographs are not always prepared for official online applications. A modern phone can produce a sharp portrait measuring 800 × 1200 pixels and weighing 2.8 MB, but the visa portal may require different dimensions, a specific file format, or a much smaller file size. The important thing to understand is that every country and visa category can have different photo requirements. For example, some applications request a square digital image, while others require different proportions or detailed instructions about head size, background, and image quality. A photograph measuring 600 × 600 pixels may be suitable for a particular application, but it should not be treated as a universal requirement. Before editing your picture, always check the official instructions for the embassy, consulate, or immigration service handling your application. The good news is that preparing your photograph does not necessarily require expensive software or professional editing skills. With a browser-based image tool such as RupaaCompress, you can prepare your image by cropping it, adjusting its dimensions, converting its format when supported, and reducing its file size. In this guide, you will learn how to resize a photo for a visa application, how to avoid common upload errors, how to protect your personal photographs, and how to prepare a clear image that follows the requirements of your particular application.
Why Do Visa Application Portals Reject Photos?
Visa application websites use technical and photographic requirements to help ensure that submitted images are suitable for identification and processing. When a photograph fails validation, the problem may be related to its dimensions, file size, format, composition, or image quality. For example, an application may accept only JPG or JPEG files, while your original smartphone photograph is saved as HEIC or another unsupported format. In another situation, the file format may be correct, but the image exceeds the maximum permitted upload size. Some portals also set minimum and maximum pixel dimensions, meaning an image that is too small or excessively large may not be accepted. The composition of the photograph matters as well. If the instructions require a head-and-shoulders portrait, a tightly cropped image that cuts off part of your head or chin could fail the requirements even if its file size is correct. Likewise, a photograph with a distracting background, uneven lighting, strong shadows, or an unclear face may not meet the official photographic standards. Some systems perform automatic technical checks, but passing those checks does not guarantee that an immigration officer will accept the image. It is also important to distinguish between image resizing, cropping, and compression. Resizing changes the image’s pixel dimensions, cropping removes unwanted areas around the subject, and compression reduces the amount of data required to store the file. These processes solve different problems, so you may need to use more than one. Consider a portrait measuring 800 × 1200 pixels. If your application requires a 600 × 600 pixel square image, you cannot simply force the entire portrait into those dimensions without changing its proportions. You would normally need to crop the image appropriately before resizing it. However, if the official application requires a different aspect ratio, forcing it into a square could make it unsuitable. Understanding these differences before editing your photograph can save time and reduce the risk of repeated upload failures.
Understanding Visa Photo Dimensions, File Size, and Format
Before preparing your photograph, locate the exact photo specifications published by the relevant immigration department or embassy. Do not rely entirely on advice from blogs, social media posts, or image-resizing websites because requirements can vary between countries, visa categories, and online application systems. One country may specify its photograph in physical measurements, while a digital application may provide pixel dimensions and a maximum file size. Other applications include precise instructions about the distance between the eyes, the proportion of the face within the frame, the background colour, and the position of the head. If a portal requests a 600 × 600 pixel photograph, prepare those dimensions. If it requests another size, use the stated measurements instead. The same principle applies to file size. An application may allow up to 100 KB, 200 KB, or another limit, so there is no single maximum that applies to every visa photograph. For example, reducing a 2.8 MB image to 85 KB would make the file approximately 97% smaller. That reduction can be useful when an application has a strict size limit, but the final image must remain sufficiently clear to show the applicant’s facial details. Avoid applying so much compression that the photograph develops visible pixelation, colour changes, or blurry edges. File format is another important consideration. JPG and JPEG are widely used for photographs, but not every application accepts every image format. Some portals may support additional formats, while others enforce a specific extension or encoding. Renaming a file from .png to .jpg does not actually convert its image data. You must use an appropriate conversion tool when a different format is required. It is also worth checking whether the portal allows photographs to be edited after capture or specifies restrictions on digital alterations. Basic cropping and resizing may be necessary to meet technical requirements, but filters, facial retouching, background replacement, and other modifications may violate the rules. Your objective should be to prepare the original photograph for the official system without changing your actual appearance.
How to Resize a Photo for a Visa Application Using RupaaCompress
Preparing a visa photograph becomes easier when you work through the requirements one step at a time. Start by opening the official application instructions and noting the required pixel dimensions, permitted format, maximum file size, and photographic rules. Keep a copy of the original image before making any changes. This gives you a clean backup if you accidentally crop the photograph incorrectly or apply excessive compression. Next, open RupaaCompress and choose the suitable image tool for your task. If your original photograph contains too much space around your head or shoulders, use the crop tool to adjust its composition. Select a square aspect ratio only when the application requires or permits one. Position the image carefully and ensure that the top of your head, chin, and other required facial features remain visible. Do not crop the photograph so tightly that it violates the official framing guidelines. After cropping, open the resize tool and enter the exact pixel dimensions specified by the visa portal. For example, if your application explicitly requires 600 × 600 pixels, enter a width of 600 pixels and a height of 600 pixels. If the application specifies 600 × 800 pixels or another size, use those dimensions instead. Where possible, maintain the correct proportions rather than stretching the photograph to fill a frame. The next step is format conversion. If the portal requires JPG or JPEG, select that output format using a compatible conversion tool. Once the format and dimensions are correct, use the compression tool to reduce the file size if necessary. Adjust the quality setting gradually and check the resulting file size after each change. A photograph that originally occupies 2.8 MB might be reduced to 85 KB, but that result depends on its dimensions, visual detail, and compression settings. Before downloading the image, inspect the preview and make sure that the face remains clear and the photograph still looks natural. Download the final file and open it from your device to verify that it has the correct dimensions, format, and file size. Finally, return to the official application portal and upload the image. If the system displays an error, read the message carefully and check the relevant requirement instead of repeatedly uploading the same file.
Protecting Your Privacy When Editing Visa and Passport Photos
Privacy is particularly important when handling visa photographs because they contain identifying facial details. Depending on how an image was created and saved, the original file may also contain metadata, such as the date the photograph was taken or details about the device used. When applicants search for a quick online photo resizer, they sometimes upload personal photographs to unfamiliar websites without checking how the service handles those files. Some online image editors send selected images to remote servers for processing. Depending on their policies and technical setup, the services may store files temporarily or retain certain information beyond the editing session. This does not mean that every online tool is unsafe, but it is a reason to be cautious when working with sensitive documents. A browser-based tool that processes images entirely on your device can help reduce this exposure because the image does not need to be transmitted to a remote server for editing. RupaaCompress offers browser-based image utilities for tasks such as cropping, resizing, and compression. When privacy is a priority, confirm that the particular tool you are using processes your selected files locally and review the website’s current privacy information. A local-processing workflow can be useful because you can prepare the image without relying on an external server to perform the editing itself. Nevertheless, no image editor can guarantee that an application will accept your photograph simply because you edited it privately. You must still meet the official photo requirements. You should also avoid using unapproved filters or artificial intelligence features to alter your facial appearance, and do not upload your passport or visa documents to a service unless you understand how it handles your data. For highly sensitive material, using trusted software on your own device may be preferable. By combining careful privacy practices with the correct image dimensions and file format, you can prepare your photograph without exposing more personal information than necessary.
Common Mistakes to Avoid When Preparing a Visa Photo
Several small mistakes can cause unnecessary problems when submitting an application photograph. One of the most common is assuming that every visa requires a square image. Although some digital portals use square photographs, others specify different proportions or follow particular national photo standards. Always check the requirements for your own application. Another mistake is choosing the smallest possible file size without considering image clarity. Excessive compression can make facial features difficult to recognise, while enlarging a small photograph can reveal pixelation rather than restore lost detail. Start with the clearest suitable original image available and reduce its dimensions only as required. Background and lighting also deserve attention. Use a plain background when the official rules require one, avoid strong shadows, and make sure the face is evenly illuminated. Follow the application’s instructions regarding glasses, head coverings, facial expressions, and other appearance requirements. These rules are not identical across all countries, so do not assume that removing glasses or choosing a particular facial expression is mandatory for every application. Another frequent error is converting an image incorrectly by changing only its filename extension. If the portal requires JPG, use an actual image-conversion function and then verify the downloaded file. You should also avoid relying on the image preview alone, as the downloaded version may have different dimensions or file properties from the original. Finally, do not leave photo preparation until the last minute. Preparing your photograph before completing the final submission steps gives you time to resolve errors and obtain a new photograph if the original does not meet the official guidelines.
Frequently Asked Questions About Resizing Visa Photos
What is the ideal size for a digital visa photograph? There is no universal size for every visa application. The required dimensions depend on the country, visa category, and application system. A 600 × 600 pixel image is appropriate only when it matches the relevant instructions. Always consult the official requirements before editing.
Which format should I use for an online visa photo? JPG or JPEG is accepted by many online application systems, but some portals permit or require other formats. Follow the instructions provided by the embassy or immigration service. Remember that renaming a file does not convert its format.
Can I compress my visa photo without losing quality? You can often reduce a photograph’s file size while retaining good visual clarity, especially when the original image is larger than necessary. However, some compression reduces image quality. Review the final image carefully before submitting it.
Can I resize my visa photo for free? Yes. Free browser-based image utilities such as RupaaCompress can help you crop, resize, and compress photographs. Choose the correct tool for the task and verify the downloaded file before uploading it.
Are online visa photo resizers safe? Safety depends on the specific service and how it processes files. Tools that genuinely perform image processing locally in the browser can reduce the need to upload personal photographs to remote servers. Check the tool’s privacy information and processing behaviour before using it for sensitive documents.
Will a correctly resized photo guarantee visa approval? No. A correctly sized image can help satisfy the technical requirements, but acceptance also depends on the official rules for composition, background, lighting, facial visibility, and other specifications. Meeting the photo requirements does not guarantee that the visa application itself will be approved.