Facebook remains an important platform for businesses, content creators, online stores, and digital marketers. Whether you are sharing product photographs, promotional graphics, business announcements, or short-form content, the quality and presentation of your images can influence how people experience your brand.
However, publishing images on Facebook can sometimes be frustrating. You might spend hours designing a promotional graphic, only to discover that important text has been cropped, a logo is partially hidden, or the image looks blurry after uploading.
These problems often happen when an image is prepared without considering its aspect ratio, dimensions, resolution, and intended placement.
Choosing suitable Facebook image sizes helps you create cleaner, more consistent visual content across different devices. It also makes it easier to maintain your brand identity and avoid unnecessary editing after publishing.
In this guide, you will learn the recommended Facebook image dimensions for feed posts, Stories, Reels, and cover photos. You will also discover how to crop, resize, and compress images using browser-based tools such as RupaCompress.
Featured image: Insert whatsapp-image-2026-11-02-at-10-47-00-pm-1-min-1.webp once directly below this introduction’s H1 heading.
Why Facebook Image Dimensions Matter
Using the right image dimensions is an important part of preparing professional social media content. Although Facebook can automatically resize and crop uploaded images, the results may not always match your original design.
Here are several reasons to prepare images carefully before publishing.
1. Prevent Unwanted Cropping
Images with unsuitable aspect ratios may appear differently across Facebook placements and devices. Important text, logos, product details, or faces can be pushed towards the edges and become partially hidden.
Preparing your design for its intended placement helps reduce unwanted cropping.
2. Maintain a Professional Brand Image
Consistent image dimensions help your Facebook Page look more organized. Clear product photographs, properly aligned promotional graphics, and well-designed cover images create a more professional appearance.
3. Improve the Mobile Viewing Experience
Many people browse Facebook on smartphones. Vertical and square designs can use screen space effectively, depending on the placement.
Preparing images with mobile viewing in mind helps make text, products, and visual information easier to see.
4. Reduce Unnecessary File Size
Large image files can take longer to upload and may be processed by Facebook after submission. Compressing images before publishing can help reduce file sizes while maintaining acceptable visual quality.
Remember that image dimensions and file size are different. Resizing changes the pixel width and height, while compression reduces the amount of data stored in the image.
Facebook Image Sizes Cheat Sheet for 2026
The following dimensions are practical design recommendations for common Facebook placements. They are not all strict platform requirements, and Facebook may adjust how images appear across different devices and interfaces.
| Facebook image type | Recommended dimensions | Aspect ratio |
|---|---|---|
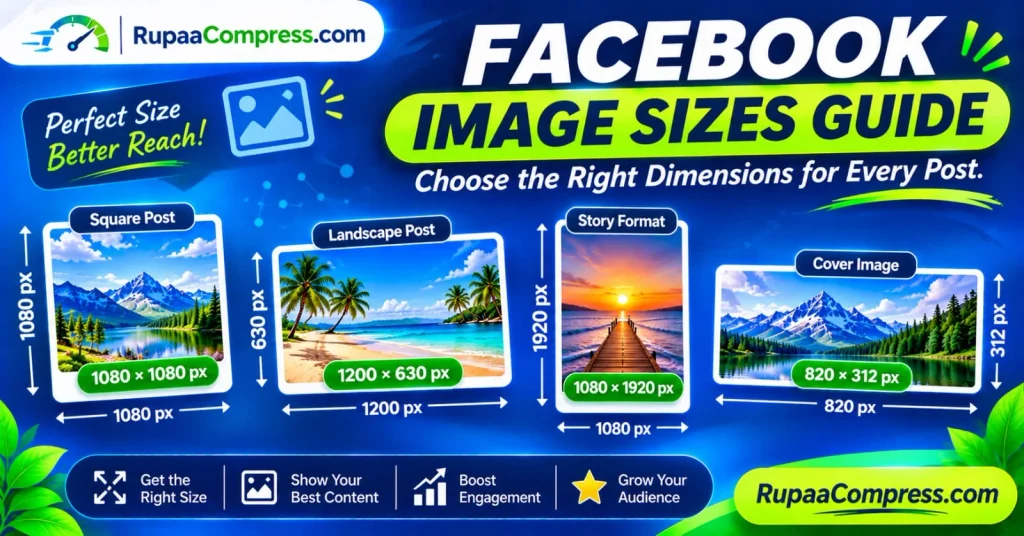
| Square feed post | 1080 × 1080 px | 1:1 |
| Portrait feed post | 1080 × 1350 px | 4:5 |
| Landscape feed or link graphic | 1200 × 630 px | 1.91:1 |
| Story image | 1080 × 1920 px | 9:16 |
| Reels video canvas | 1080 × 1920 px | 9:16 |
| Facebook Page cover | 851 × 315 px | Approximately 2.7:1 |
| Page profile picture | 320 × 320 px | 1:1 |
| Group cover image | 1640 × 856 px | Approximately 1.91:1 |
| Event cover image | 1920 × 1005 px | Approximately 1.91:1 |
Always preview your design after uploading. Facebook can display the same image differently depending on its placement and the viewer’s device.
Best Facebook Feed Post Image Sizes
Feed posts are one of the most common ways to share updates, promotions, product photographs, and branded content.
There are three useful formats to consider.
Square Facebook Posts: 1080 × 1080 Pixels
A 1080 × 1080 pixel image has a 1:1 aspect ratio. It is a versatile option for product announcements, promotional graphics, quotations, and general business updates.
Square designs are relatively easy to reuse across different social media platforms.
Best for:
- Product photographs
- Promotional graphics
- Business announcements
- Quote images
- General social media posts
Portrait Facebook Posts: 1080 × 1350 Pixels
A 1080 × 1350 pixel image uses a 4:5 aspect ratio. This vertical layout can occupy more screen space than a square image when displayed in compatible feed placements.
It is particularly useful for product showcases, educational graphics, and promotional designs containing more visual information.
Best for:
- Product displays
- Step-by-step graphics
- Educational content
- Promotional campaigns
- Lifestyle photography
Landscape Facebook Posts: 1200 × 630 Pixels
A 1200 × 630 pixel image uses an approximately 1.91:1 aspect ratio. It is commonly used for website link previews, landscape photographs, and wide promotional graphics.
This format is particularly useful when sharing blog articles or website content.
Best for:
- Blog post previews
- Website links
- Landscape photography
- Wide promotional banners
- Article thumbnails
Facebook Story Image Size
Facebook Stories are designed for vertical, full-screen viewing.
A practical design canvas is:
1080 × 1920 pixels (9:16 aspect ratio).
This format is suitable for product promotions, limited-time announcements, behind-the-scenes content, and short visual updates.
When designing a Story, remember that Facebook displays interface elements around the content. Profile information, navigation controls, and reply areas may cover parts of the screen.
For a better viewing experience:
- Keep important text away from the top and bottom edges.
- Place logos and key information within the central area.
- Use large, readable text.
- Avoid placing essential information too close to the sides.
- Preview the image on a smartphone before publishing.
Facebook Reels Dimensions
Facebook Reels use a vertical video format. A 1080 × 1920 pixel canvas with a 9:16 aspect ratio is a practical choice when preparing Reel content.
Although Reels are primarily video-based, their covers and promotional graphics also require careful design.
For better presentation:
- Use a vertical layout.
- Keep important visual elements away from interface overlays.
- Make titles and captions easy to read.
- Use high-quality images and video.
- Preview the Reel on a mobile device.
A well-prepared vertical design helps your content fit the intended viewing experience.
Facebook Cover Photo Size
Your Facebook Page cover photo is one of the most visible parts of your business profile. It provides an opportunity to introduce your brand, highlight a campaign, or communicate what your business offers.
For a Facebook Page cover, a commonly recommended upload size is:
851 × 315 pixels.
Facebook displays cover photos differently on desktop and mobile devices. The image may be cropped or resized to fit each screen, so using the correct upload dimensions alone does not guarantee that every part of your design will remain visible.
To avoid unwanted cropping:
- Keep your logo and main message near the central area.
- Avoid placing important text close to the edges.
- Check the cover on both desktop and mobile.
- Use a high-quality image.
- Reposition the image during upload if necessary.
For cover designs containing logos or text, a PNG may preserve sharper edges. For photographic images, an appropriately optimized JPEG is often suitable.
Facebook Profile Picture Size
A Facebook Page profile picture should be prepared as a square image.
A recommended design size is:
320 × 320 pixels (1:1 aspect ratio).
Facebook commonly displays profile pictures in a circular shape. Therefore, avoid placing important parts of your logo or photograph near the corners.
For businesses, a clear logo with good contrast is usually more recognizable than a design containing too much text.
Facebook Group and Event Cover Images
Facebook Groups and Events use different cover layouts from standard Page cover photos.
For a Facebook Group cover, 1640 × 856 pixels is a commonly recommended design canvas.
For a Facebook Event cover, 1920 × 1005 pixels is a commonly used landscape design canvas.
These are practical recommendations rather than guaranteed display requirements. Check the current Facebook upload interface and preview your design before publishing.
Common Facebook Image Size Mistakes to Avoid
Even a well-designed graphic can look unprofessional when it is prepared incorrectly.
Here are some common mistakes to avoid.
Using One Image Size for Every Placement
A square promotional graphic may work well in a feed post but may not fit a full-screen Story.
Instead of stretching one design across every placement, prepare separate versions using the appropriate aspect ratios.
Stretching Images Instead of Cropping Them
Changing an image’s width and height independently can distort faces, products, and other visual elements.
Maintain the original aspect ratio when resizing. If a different shape is required, use a crop tool to select the appropriate area.
Uploading Low-Resolution Graphics
Small images enlarged to fit larger display areas can appear blurry or pixelated.
Start with a sufficiently high-resolution original image and resize it down to the required dimensions whenever possible.
Placing Text Too Close to the Edges
Facebook may crop images differently depending on the placement and screen size.
Keep important text, logos, and product details within a safe central area.
Overcompressing Images
Reducing file size is useful, but excessive compression can create visible artifacts, blurry text, and poor image quality.
Always review the exported image before publishing.
The Privacy Considerations of Online Image Editing
Preparing social media graphics often involves editing product photographs, unpublished campaign artwork, customer images, and other business materials.
Some online editing services require users to upload their files to remote servers for processing. Depending on the provider, this may involve additional data handling, storage, or third-party processing.
Before uploading confidential or sensitive images, review the service’s privacy policy and understand how uploaded files are handled.
Consider Local Browser-Based Image Processing
Some browser-based image tools use technologies such as JavaScript and the HTML5 Canvas API to perform supported operations directly on the user’s device.
When a tool genuinely processes an image locally, the original file does not need to be uploaded to a remote processing server for that operation.
RupaCompress provides browser-based image utilities designed to make common image tasks easier.
For supported operations that run locally, this approach can reduce the need to transfer image files to an external server.
However, local processing should not be treated as a guarantee of complete privacy. Website analytics, advertising scripts, browser extensions, and other services may still collect information. Check the tool’s privacy information and avoid processing sensitive files on devices you do not trust.
How to Resize and Optimize Facebook Images Using RupaCompress
Preparing Facebook graphics does not need to be complicated. Follow this simple workflow to create appropriately sized images before publishing.
Step 1: Prepare Your Original Image
Choose the photograph or graphic you want to publish.
Start with a good-quality original file. If you are creating a promotional graphic, consider the intended Facebook placement before designing it.
For example:
- Square feed post: 1080 × 1080 px
- Portrait feed post: 1080 × 1350 px
- Landscape graphic: 1200 × 630 px
- Story or Reels canvas: 1080 × 1920 px
Step 2: Crop the Image
Open the Crop Image tool on RupaCompress, where available.
Select the area you want to keep and adjust the composition to suit your intended Facebook format.
For example, if you are converting a landscape photograph into a square post, crop around the most important subject rather than stretching the original image.
Step 3: Resize to the Required Dimensions
Use the Resize Image tool to adjust the image’s width and height.
Enter the dimensions for your selected placement. Maintain the correct aspect ratio to avoid distortion.
If the original image has a different aspect ratio, crop it first or choose a suitable fit option.
Step 4: Compress the Image
After resizing, open the Compress Image tool.
Adjust the compression settings to reduce unnecessary file size while maintaining acceptable visual quality.
Compare the original and compressed versions before downloading. Check small text, product details, edges, and other important elements.
Step 5: Choose a Suitable File Format
Select a suitable output format based on the image.
- JPEG: A practical choice for photographs and many social media graphics.
- PNG: Useful for logos, transparent graphics, and designs with sharp text or edges.
- WebP: A modern format that can provide efficient compression, although you should check that the destination supports the file as expected.
For Facebook publishing, JPEG and PNG are generally practical choices. Check the current upload options before using other formats.
Step 6: Preview and Download
Review the final image before downloading it.
Check that:
- The dimensions are correct.
- Important content is not cropped.
- Text remains readable.
- The image is not visibly distorted.
- The file opens correctly.
Step 7: Upload to Facebook
Open your Facebook Page, profile, Group, or publishing interface.
Upload the prepared image and check its appearance before publishing. If Facebook provides a repositioning or cropping option, use it to make any final adjustments.
Pro Tips for Better Facebook Image Optimization
A few simple practices can make your image preparation workflow more efficient.
Keep important content within safe areas: Avoid placing logos, text, and product details too close to the edges.
Create separate designs for different placements: Prepare square, portrait, landscape, and vertical versions rather than forcing one graphic into every format.
Use descriptive file names: Names such as facebook-square-product-post.jpg or facebook-story-promotion.jpg make your local image library easier to organize.
Keep a consistent visual identity: Use consistent brand colors, typography, and logo placement across your Facebook graphics.
Check images on mobile: A design that looks good on a desktop screen may appear different on a smartphone.
Keep original files: Save an uncompressed copy of important campaign graphics so you can edit or export them again later.
Optimize without sacrificing quality: Use compression carefully and review the final image before publishing.
Frequently Asked Questions (FAQs)
What is the best image size for a Facebook feed post?
A 1080 × 1080 pixel square image is a versatile option for standard feed posts. A 1080 × 1350 pixel portrait image is another useful format when you want a taller design.
What is the recommended Facebook cover photo size?
A commonly recommended Facebook Page cover photo size is 851 × 315 pixels. Facebook may crop the image differently on desktop and mobile, so keep important content near the center.
What size should a Facebook Story image be?
A 1080 × 1920 pixel image with a 9:16 aspect ratio is a practical choice for Facebook Stories.
What dimensions should I use for Facebook Reels?
A 1080 × 1920 pixel vertical canvas with a 9:16 aspect ratio is a practical starting point for Reels content.
Should I use JPEG or PNG for Facebook images?
JPEG is suitable for most photographs, while PNG is useful for graphics containing logos, text, and sharp edges. Choose the format that provides the best balance between appearance and file size.
Does Facebook automatically resize uploaded images?
Facebook may resize, compress, or crop images to suit different placements and devices. Preparing an image with a suitable aspect ratio and resolution can help you maintain better control over its appearance.
Can I resize Facebook images without installing software?
Yes. Browser-based image tools can resize, crop, and compress images without requiring desktop editing software. The way files are processed depends on the individual tool.
Are local browser-based image tools private?
Tools that genuinely perform supported operations locally can reduce the need to upload image files to a remote processing server. However, local processing alone does not guarantee complete privacy. Review the website’s privacy policy and other data practices.
Conclusion
Choosing the right Facebook image sizes is an important part of creating professional social media content. From square feed posts and portrait graphics to vertical Stories and Page cover photos, each placement benefits from an appropriately prepared design.
By using suitable dimensions, maintaining the correct aspect ratio, avoiding unnecessary cropping, and compressing images carefully, you can create cleaner graphics for your Facebook audience.
You do not need expensive desktop software for every image-editing task. Browser-based tools such as RupaCompress can help you crop, resize, and compress supported image formats as part of a simple publishing workflow.
Prepare your images carefully, preview them on different devices, and keep your visual content consistent with your brand.