Preparing documents for international travel can be an exciting step towards a holiday, overseas job, university admission, or a new experience in another country. However, the paperwork involved in travelling abroad can sometimes be confusing, particularly when you discover that different applications require different types of photographs. You might already have a passport photograph saved on your phone or computer and assume that you can use the same image when applying for a student visa, tourist visa, or work permit. Although passport and visa photographs may look almost identical, their requirements are not necessarily the same. Each application follows the rules established by the relevant government department, embassy, consulate, or immigration authority. For example, a US passport photograph printed for a paper application must measure 2 × 2 inches (51 × 51 mm), while the United Kingdom’s current digital visa photo guidance requires a vertically oriented JPG or JPEG measuring at least 600 pixels wide and 750 pixels tall. These differences demonstrate why it is important to check the requirements before editing or submitting your photograph. Other countries may specify different physical measurements, digital dimensions, background conditions, facial proportions, and maximum file sizes. Even when two applications accept photographs of similar dimensions, they may have different rules about how recently the image must have been taken or whether an existing identity photograph can be reused. A photograph that was accepted for your passport will not automatically be suitable for every visa application. The good news is that preparing an image for an online application does not always require expensive editing software or professional photography skills. With browser-based image utilities such as those available at RupaaCompress, you can prepare images by cropping, resizing, and compressing them when those changes are permitted by the relevant authority. In this guide, you will learn the main differences between passport and visa photographs, how to check the correct specifications, which common mistakes to avoid, and how to prepare your image more carefully before submitting your travel documents.
1. Understanding the Purpose of Passport and Visa Photographs
A passport photograph and a visa photograph both help authorities identify an applicant, but they serve different purposes within the travel documentation process. A passport is an identity and travel document issued by your own country. It establishes your identity and nationality for international travel and is generally valid for several years, depending on the country and the type of passport. Because a passport may remain valid for an extended period, the photograph must accurately represent your appearance when the document is issued. Passport authorities therefore specify requirements for the background, lighting, head position, facial expression, image quality, and overall composition. A visa photograph, on the other hand, is submitted as part of an application for permission to enter, stay in, or travel through another country under particular conditions. The requirements may depend on the destination country, visa category, and application method. A tourist visa, student visa, employment visa, or residence application may use different instructions even when the applicant submits the photograph through an online portal. These differences explain why you should not assume that a passport photograph will automatically work for a visa application. For example, the United States has specific requirements for both passport photographs and digital visa photographs, while UK Visas and Immigration publishes its own digital photo instructions. You can review the official US passport photo requirements and the UK visa photo guidance to see how the rules are defined for different applications. The photograph’s purpose also affects what changes are acceptable. Adjusting an image’s dimensions or cropping it to the required frame is not the same as digitally altering facial features, changing your appearance, or applying beauty filters. Some authorities require an original, unedited photograph and may reject digitally altered images. The safest approach is to begin with a clear, recent photograph that follows the official photographic instructions and make only the adjustments expressly permitted by the relevant authority.
2. Passport Photo vs. Visa Photo: The Main Differences
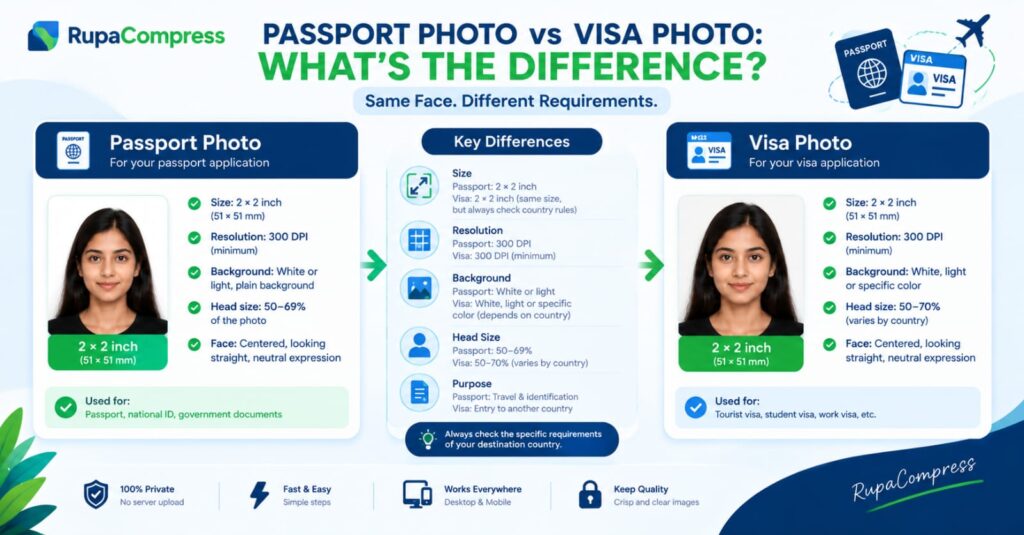
The most important difference between passport and visa photographs is that their specifications depend on the issuing authority rather than on a universal international photo size. Some countries use a square photograph, while others specify a vertical portrait with different measurements. The United States is one example of a country that uses a 2 × 2 inch format for paper passport photographs and has separate digital specifications for US visa photographs. The United Kingdom, by comparison, requires a vertically oriented digital visa photo measuring at least 600 × 750 pixels under its published guidance. A square 600 × 600 pixel image would not meet that UK minimum because its height is too small and its orientation does not follow the stated requirement. This illustrates why choosing the correct dimensions is more important than simply selecting a popular photo size. Background requirements can also vary. A plain white or off-white background is required for US passport photographs, while other application systems may describe their permitted background colours differently. You should never assume that a light grey, blue, or cream background will be accepted without checking the relevant instructions. Head proportions and positioning are equally important. Authorities may specify how much of the image the head should occupy, how the face should be centred, and whether the full head and shoulders must be visible. A photograph can have the correct pixel dimensions but still fail because the face is too close to the camera, too far away, poorly positioned, or partly obscured. Image recency is another consideration. Some authorities require a recent photograph and specify a particular timeframe. The US passport photo guidance, for example, calls for a photograph taken within the last six months. Other systems may have their own instructions, so do not assume that the same age requirement applies everywhere. File formats and file sizes also differ. A digital portal may require a JPG or JPEG image and impose a maximum file size, while another application may accept a different format or set a different limit. Print resolution is not automatically a universal requirement either. A resolution such as 300 pixels per inch may be specified when scanning an existing photograph for a particular application, but it is not a rule that applies to every digital passport or visa upload. Always check the exact specifications published by the authority handling your application before preparing the final image.
3. Why Can a Passport Photo Be Rejected for a Visa Application?
One of the most common mistakes applicants make is assuming that a photograph is acceptable simply because it was used successfully in another application. Unfortunately, a passport photo that looks perfectly clear on your phone may still fail a visa portal’s technical or photographic checks. The first possible reason is an incorrect aspect ratio. If a visa application requests a vertical portrait and you submit a square photograph, the system may reject the file or require you to provide another image. A second problem is incorrect cropping. Your original photograph might contain too much empty space around your head, or the face may be positioned too high or too low in the frame. Cropping the image incorrectly can remove part of your head or shoulders and make the composition unsuitable. File size is another common issue, particularly when photographs are captured with modern smartphones. A high-resolution image may occupy several megabytes, while the application portal may impose a much smaller upload limit. Even when your photograph looks correct, a file that exceeds the limit can prevent the upload from being completed. Unsupported file formats can create similar problems. An image saved in HEIC or PNG format may not be accepted by a portal that specifically requests JPG or JPEG. Background colour, shadows, poor lighting, blurry details, and facial positioning can also cause difficulties. However, correcting these problems requires care. If the original photograph has a distracting background, harsh shadows, or an unsuitable facial position, simply resizing it will not necessarily make it compliant. You may need to take a new photograph instead. Some applications also prohibit digital alterations, so replacing a background or modifying facial features to meet a visual specification may cause additional problems. Before changing anything, read the official instructions and identify exactly what is wrong with your file. If the issue concerns dimensions or file size, a suitable resizing or compression tool may help. If the issue concerns the photograph itself, capturing a new image that follows the official rules is usually the better option.
4. How to Crop, Resize, and Prepare Travel Photos Using RupaaCompress
Once you have confirmed the official requirements, you can begin preparing your photograph. First, save a copy of the original image on your device. Keeping the original means you can start again if you make a mistake during editing or discover that the application requires a different size. Next, open RupaaCompress and explore the available image utilities to identify the appropriate tool for your task. If your photograph contains unnecessary empty space around the subject, a crop tool can help you select the correct framing. Choose a square or vertical aspect ratio only when it matches the requirements for your particular application. Position the face carefully and ensure that the full head, chin, and other required features remain visible. Avoid stretching the photograph to force it into a particular shape because this can distort the person’s appearance. If the required dimensions are expressed in pixels, use the resize tool to enter the specified width and height. For example, a UK digital visa application following the current published guidance requires a portrait that is at least 600 pixels wide and 750 pixels tall. The US digital visa requirements provide a different example: they specify a square image between 600 × 600 and 1200 × 1200 pixels, in JPEG format, with a maximum file size of 240 KB. These are examples of two different systems, not interchangeable settings for every visa. You can confirm the details using the official US digital visa image requirements. Once you have the correct dimensions, convert the file to the required format if necessary. Changing a filename extension alone does not convert an image, so use a genuine conversion function and check the output. If the file is too large, reduce its size through controlled compression while preserving sufficient detail for identification. After editing, open the downloaded file and verify its dimensions, format, size, orientation, and appearance before uploading it. Most importantly, make sure the tool’s processing behaviour is suitable for your privacy needs before using it with sensitive identity photographs. Do not assume that an online service processes every image locally unless that behaviour has been confirmed. The aim is to prepare a compliant photograph, not to alter your identity or bypass the application’s requirements.
5. Protecting Your Privacy When Editing Passport and Visa Photographs
Passport and visa photographs deserve special care because they contain identifying facial information. Depending on how an image was captured and saved, it may also contain metadata relating to the date, time, or device used to create the photograph. When applicants search for a quick online photo converter, they may upload their images to unfamiliar websites without considering how the files are processed or stored. Some services perform image editing on remote servers, meaning the selected files must be transferred away from the user’s device. Other tools can process images directly within the browser. These approaches are different, and it is important to understand how a particular tool works before using it for sensitive documents. Local browser processing can reduce the need to transmit personal images to a remote server for editing, but it should not be assumed that every online image editor provides this feature. RupaaCompress offers browser-based image utilities that can help users with common image preparation tasks. Before working with passport or visa photographs, check the relevant tool’s current privacy information and confirm how the image is handled. If you are unable to verify the processing method and your photograph is particularly sensitive, consider using trusted software installed on your own device instead. You should also avoid sharing identity photographs through public links or unfamiliar file-sharing services unless there is a clear reason to do so. Privacy is only one part of the process, however. Even when you use a privacy-conscious image editor, your photograph must still follow the official technical and photographic requirements. A secure workflow does not guarantee that a visa photo will be accepted, and a properly sized image will not necessarily pass the application review if its composition or appearance is unsuitable. Keep your original photograph, edit only what the authority permits, and review the finished file before submission. These precautions help you manage your documents more responsibly while reducing avoidable problems during the application process.
6. Practical Tips to Avoid Passport and Visa Photo Rejection
A few simple checks can help you avoid common photo-related errors. Start by reading the instructions for your exact passport or visa application rather than relying on a general photo-size guide. Record the required dimensions, permitted format, maximum file size, background colour, head position, and any rules concerning the age of the photograph. When taking a new photo, use even lighting and a plain background that complies with the official requirements. Face the camera directly and keep your face fully visible. Follow the relevant instructions about facial expression, glasses, head coverings, and clothing rather than assuming the same rules apply to every application. Do not use beauty filters, face-smoothing effects, or artificial intelligence tools to change your appearance. Certain authorities explicitly require photographs to remain unedited, so check whether cropping, resizing, or format conversion is permitted before applying any changes. Once you have prepared the file, confirm that its actual dimensions match the portal’s specifications. Check the downloaded image rather than relying only on the editing preview. If the application imposes a file-size limit, verify the final file size as well. You may also rename the file using a simple descriptive name, such as passport-photo.jpg or visa-application-photo.jpg, to keep your documents organised. However, the filename does not determine whether the photograph is compliant. Finally, leave enough time before your submission deadline to retake a photo if necessary. A clear new photograph taken according to the official guidelines is usually a better starting point than trying to repair an unsuitable original through extensive editing.
Frequently Asked Questions
Can I use my passport photo for a visa application?
Sometimes, but it depends on the destination country and visa category. The photo must meet the requirements of the specific visa application, including dimensions, background, recency, composition, and file format. Some authorities also prohibit reusing an image that appears in an existing identity document. Check the official instructions before submitting the same photograph.
Are passport and visa photos always 2 × 2 inches?
No. A 2 × 2 inch (51 × 51 mm) photograph is used for certain applications, including US paper passport photos and US visa photos. Other countries and application systems require different dimensions, such as vertical photographs measured in millimetres or specified in pixels.
Do passport and visa photos need 300 DPI?
Not universally. The required resolution depends on the application and whether you are preparing a printed photograph, scanning an existing image, or uploading a digital file. Follow the exact instructions provided by the authority rather than applying a generic DPI setting.
Can I resize my photo without changing how my face looks?
Resizing changes the number of pixels in the image, while cropping changes which parts of the image remain visible. These operations can be performed without deliberately altering facial features, provided you maintain the proportions and follow the applicable rules. Avoid stretching, face retouching, or other prohibited changes.
Can RupaaCompress help prepare passport and visa photographs?
RupaaCompress provides browser-based image utilities that may help with tasks such as cropping, resizing, and compression. Choose the appropriate operation for the specifications you need, and verify the resulting file before submission. Check the privacy information and confirm the tool’s processing method before using it with sensitive identity photographs.
Will a correctly formatted photo guarantee approval?
No. Meeting the technical specifications is only one part of preparing an acceptable photograph. The image must also satisfy the applicable rules for appearance, framing, lighting, background, and other conditions. Acceptance of a photograph does not guarantee approval of the passport or visa application itself.