Facebook remains one of the most widely used social media platforms for businesses, creators, marketers and online communities. Whether you manage a business page, promote products, share company updates or publish marketing campaigns, visual content plays an important role in communicating your message. However, creating attractive graphics is only one part of the process. Choosing the correct image dimensions is equally important.
Have you ever designed a promotional image that looked perfect on your computer but appeared cropped, stretched or blurry after uploading it to Facebook? This is a common problem when images are created using incorrect dimensions or aspect ratios. Facebook displays different types of content in different layouts, and an image designed for a square feed post may not look right as a cover photo or vertical Story.
Using the correct Facebook image sizes helps your content appear professional, keeps important information visible and reduces unexpected cropping. It also makes it easier to prepare consistent graphics for different marketing campaigns.
In this comprehensive guide, you will learn the recommended Facebook image dimensions for feed posts, Stories, Reels, cover photos, profile pictures and other common placements. You will also discover how to resize, crop and compress images using free online tools such as RupaCompress.
Why Facebook Image Sizes Matter for Your Brand
Image dimensions directly affect how your content appears across Facebook. Even a well-designed graphic can lose its visual impact when uploaded in the wrong aspect ratio. Text may become difficult to read, important product details may disappear near the edges, and photographs may look different from the original design.
For businesses targeting customers in the United States, the United Kingdom, Germany and other international markets, maintaining a consistent visual identity is particularly important. Your Facebook page may be the first place a potential customer encounters your brand. Poorly displayed images can make an otherwise professional business look less organised.
Choosing suitable image dimensions also helps you make better use of available screen space. For example, square and portrait images can occupy a significant portion of the mobile feed, while landscape graphics are useful for horizontal photography and link previews.
Another important consideration is image quality. Social media platforms may process uploaded images, and large or unsuitable source files can sometimes appear less sharp after publishing. Preparing your images with appropriate dimensions and reasonable file sizes gives you greater control over the final result.
Complete Facebook Image Sizes Cheat Sheet
Facebook supports several image formats and placements. Each placement has its own layout, so it is important to prepare graphics according to their intended use.
The following dimensions are practical starting points for common Facebook placements. Facebook’s display requirements can change, so check its current specifications before preparing important advertising campaigns.
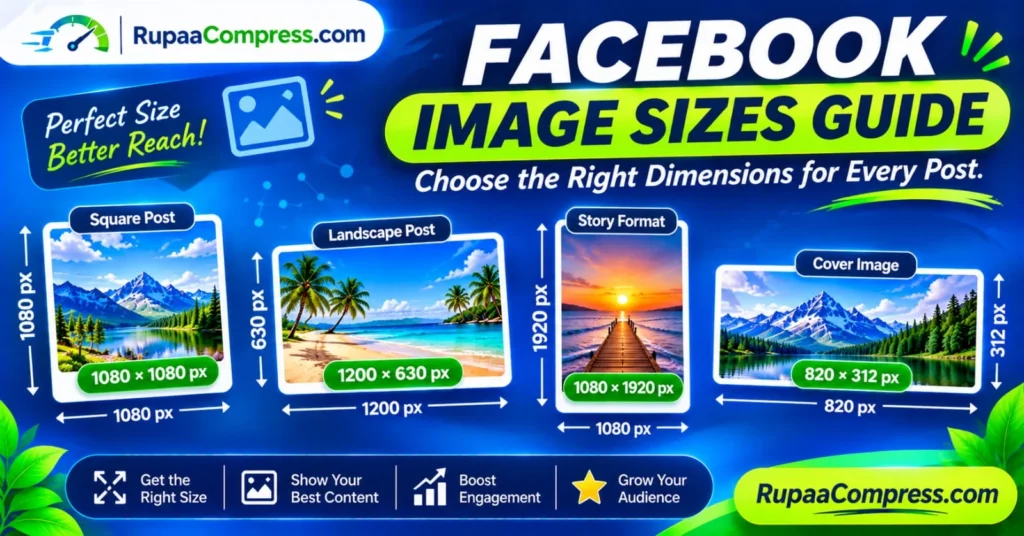
1. Facebook Feed Post Image Size
Recommended starting size: 1080 × 1080 pixels
A square image measuring 1080 × 1080 pixels is a popular choice for standard Facebook feed posts. Its 1:1 aspect ratio makes it suitable for product promotions, announcements, business updates, educational graphics and marketing messages.
Square graphics are particularly useful when you want to maintain a consistent design across multiple social media platforms. You can create one square design and adapt it for other placements when necessary.
For example, an online clothing store can use a square graphic to highlight a new collection, display a product photograph or announce a seasonal discount. A restaurant can use the same format to promote a special menu or introduce a new food item.
When designing square posts, keep important text, logos and product details away from the extreme edges. This provides some flexibility if the image is displayed differently on certain devices.
2. Facebook Landscape Post Image Size
Recommended starting size: 1200 × 630 pixels
Landscape images are suitable for horizontal photographs, promotional banners, website previews and business announcements. A 1200 × 630 pixel image has an aspect ratio of approximately 1.91:1.
This format is especially useful when sharing links to blog articles, product pages, news updates or company websites. A properly prepared landscape image can provide an attractive preview that encourages users to explore the shared content.
For example, a digital marketing agency might share a blog article about website performance using a landscape graphic containing the article title and a relevant photograph.
Before publishing, check how your image appears in the Facebook preview. Keep the most important information within the central area so that minor display differences do not affect your design.
3. Facebook Stories Image Size
Recommended starting size: 1080 × 1920 pixels
Facebook Stories use a vertical 9:16 aspect ratio and are designed for full-screen mobile viewing. A 1080 × 1920 pixel image is a practical starting point for this format.
Stories are useful for temporary promotions, product launches, behind-the-scenes content, event announcements and short marketing messages. Their vertical layout allows businesses to create immersive visuals that occupy most of a mobile screen.
For example, an online retailer can publish a vertical Story to introduce a new product, announce a limited-time promotion or direct viewers to a product page.
Avoid placing essential text, logos or other important elements too close to the top and bottom edges. Facebook interface elements may cover portions of the visual, depending on the placement and device.
4. Facebook Reels Image Size
Recommended starting size: 1080 × 1920 pixels
Facebook Reels are vertical short-form videos. Although a Reel is primarily a video format, its cover image or thumbnail also plays an important role in how the content is presented.
A vertical 1080 × 1920 pixel design is a useful starting point for preparing Reel visuals. However, the visible thumbnail crop may differ depending on where the Reel appears.
If you create promotional videos for a business, prepare a clear cover image with a readable title and recognisable branding. Keep important elements towards the centre so they remain visible when the image is displayed in different layouts.
5. Facebook Page Cover Photo Size
Common reference size: 820 × 312 pixels
A Facebook Page cover photo is the large banner displayed at the top of a business page. It is one of the first visual elements visitors notice when they open your profile.
The commonly referenced 820 × 312 pixel dimensions provide a starting point for designing a cover image. However, desktop and mobile layouts may display the cover differently, and the visible area can change as Facebook updates its interface.
For this reason, design your cover image with a central safe area. Place your business name, slogan, main product and important contact information where they are less likely to be cropped.
For example, a digital services company might use its cover image to communicate its main services, while an online shop could feature its latest collection or seasonal campaign.
Always preview your cover photo on both desktop and mobile devices before considering the design complete.
6. Facebook Profile Picture Size
Recommended starting size: 320 × 320 pixels or larger
Your Facebook profile picture represents your business or personal identity. For a business page, it is usually best to use a clear brand logo. For a personal profile, a recognisable photograph is often more appropriate.
Although you can prepare a square image, Facebook generally displays profile pictures within a circular frame in many locations. Therefore, important parts of the design should remain inside the central circular area.
Avoid placing small text around the edges because it may become difficult to read after the image is reduced.
7. Facebook Group Cover Image Size
Common reference size: 1640 × 856 pixels
Facebook Group cover images help establish the identity and purpose of a community. They can be used for educational groups, business communities, customer support groups, hobby communities and professional networks.
A 1640 × 856 pixel image is a useful reference size for preparing a group cover design. Keep the group name and other essential information within the central area to reduce the risk of cropping.
For example, a photography community could use a group cover featuring a collection of photographs, while a business community could display its name and purpose.
Facebook Image Sizes at a Glance
| Facebook placement | Suggested dimensions | Aspect ratio |
|---|---|---|
| Square feed post | 1080 × 1080 px | 1:1 |
| Landscape feed post | 1200 × 630 px | 1.91:1 |
| Stories | 1080 × 1920 px | 9:16 |
| Reels cover design | 1080 × 1920 px | 9:16 |
| Page cover photo | 820 × 312 px | Approx. 2.63:1 |
| Profile picture | 320 × 320 px or larger | 1:1 |
| Group cover image | 1640 × 856 px | Approx. 1.92:1 |
These are practical design references rather than a guarantee of identical display across every Facebook placement. Always preview your final content before publishing.
What Happens When You Upload Images with Incorrect Dimensions?
Using unsuitable dimensions can create several problems for your social media content. One of the most common is unexpected cropping. When the original image does not match the display area, Facebook may adjust how it appears. Important parts of the photograph or graphic can become hidden.
Stretching is another issue. If an image is resized without maintaining its original proportions, objects and people may look distorted. A circular logo could become oval, while product photographs may lose their natural appearance.
Low resolution can also affect the final result. Enlarging a small image to fit a larger placement may create visible pixelation and reduce sharpness. This is particularly noticeable in promotional graphics containing text, logos and detailed product photographs.
File size is another factor to consider. Very large image files may take longer to upload, especially when working with slower internet connections or preparing multiple campaign graphics. Compressing images before publishing can make the workflow more efficient.
The best approach is to select the correct dimensions first, crop the image carefully and then compress the final design while maintaining acceptable visual quality.
JPG, PNG or WebP: Which Format Should You Use for Facebook?
Selecting the right file format is another important part of preparing social media graphics. Different formats are designed for different types of images.
JPEG (JPG) is commonly used for photographs, lifestyle images, product pictures and other graphics containing many colours. It supports lossy compression, allowing you to reduce file size by adjusting the quality level.
PNG is useful for graphics containing sharp edges, text, logos and transparency. It can preserve visual details without the same type of lossy compression used by JPEG. However, PNG files can be larger, especially when they contain detailed photographs.
WebP is a modern image format that can provide efficient compression. It supports both lossy and lossless compression, as well as transparency. However, social media upload support and automatic format handling can vary by platform and placement.
For everyday Facebook publishing, JPEG is a practical choice for most photographs, while PNG is useful for graphics requiring transparency or crisp text. If you use WebP, check that the intended Facebook upload workflow accepts the file. When in doubt, export a supported JPEG or PNG version.
How to Resize and Compress Facebook Images Using RupaCompress
Once you understand the recommended dimensions, the next step is preparing your images before uploading them. You do not always need expensive graphic design software for basic resizing and compression.
RupaCompress provides online image utilities that can help with common image preparation tasks. If the relevant tools use local browser processing, you can prepare images directly in your browser without sending the original files to a remote server.
Here is a practical workflow for preparing Facebook graphics.
Step 1: Choose the Correct Facebook Image Size
Start by deciding where you want to publish the image. A square feed post, vertical Story and Page cover photo all require different proportions.
For example, choose 1080 × 1080 pixels for a square feed post or 1080 × 1920 pixels for a vertical Story. Selecting the correct dimensions before editing helps prevent unnecessary cropping later.
Step 2: Crop Your Image
Open the image in an image cropping tool and select the composition you want to use. Remove unnecessary background areas and position the main subject carefully.
For product photography, make sure the entire product remains visible. For promotional graphics, leave enough space around the headline and logo.
A good crop should communicate the main message without making the image feel crowded.
Step 3: Resize to the Required Dimensions
Use an image resizing tool to enter the exact width and height required for your Facebook placement.
For example, enter 1080 pixels for both width and height when preparing a square feed post. For a vertical Story, use 1080 pixels in width and 1920 pixels in height.
Maintain the correct aspect ratio when resizing photographs. If you force an image into different proportions without cropping, the result may look stretched.
Step 4: Compress the Image
After resizing, use an image compression tool to reduce the file size. Compression can remove unnecessary data and reduce storage requirements.
Adjust the quality setting gradually and compare the compressed result with the original image. Do not reduce the quality too aggressively, particularly when your design contains small text, product details or logos.
The objective is to achieve a practical balance between file size and visual clarity.
Step 5: Download and Preview Your Image
Download the prepared image and open it on your computer or mobile device. Check the dimensions, text readability, colours and overall appearance.
If the image looks blurry or important details are missing, return to the editing stage and make adjustments.
Step 6: Upload to Facebook
Once the image is ready, upload it to your Facebook Page, Group or intended placement. Preview the post before publishing to make sure the image appears as expected.
This simple workflow helps you create consistent social media graphics without repeatedly redesigning the same content.
The Privacy Risk of Using Online Image Editing Tools
Many businesses use online tools to crop, resize and compress their images. These services can be convenient, but it is important to understand how they handle uploaded files.
Marketing graphics may contain unreleased product information, confidential campaign designs, customer photographs or internal business material. Uploading such files to an unfamiliar service without checking its privacy policy can create unnecessary risks.
Not every online image tool processes files in the same way. Some services upload images to remote servers for processing, while others perform the work directly inside the user’s browser.
Before using any online tool for confidential business assets, review its privacy policy and understand whether files are transmitted, stored or retained.
Why Local Browser-Based Processing Can Help
Browser-based image processing can use technologies such as JavaScript and the HTML5 Canvas API to perform image operations on a user’s device.
When a tool genuinely performs the entire image-processing operation locally, the original image does not need to be uploaded to a remote server for that operation. This can reduce unnecessary file transfers and provide a more privacy-conscious workflow.
However, local processing should not automatically be treated as a guarantee that every part of a website is private. Other website functions, such as analytics, advertising, external scripts or contact forms, may still communicate with external services.
For confidential or commercially sensitive material, verify the tool’s actual processing behaviour and privacy documentation before use.
Pro Tips for Creating Better Facebook Graphics
Preparing the correct dimensions is important, but good visual design also influences how effectively your content communicates.
First, keep your most important information near the centre of the image. This helps protect headlines, logos and product details from unexpected cropping across different displays.
Second, use readable typography. Avoid extremely small text, complicated fonts and excessive wording. A promotional graphic should communicate its main message quickly, especially when viewed on a mobile phone.
Third, maintain consistent branding. Use the same logo, brand colours and general design style across your Facebook posts. Consistency makes your content easier to recognise.
Fourth, use high-quality original photographs whenever possible. Resizing a low-resolution image to a larger dimension will not restore missing detail.
Fifth, create separate versions for different placements. Instead of using one graphic everywhere, prepare square, landscape and vertical versions according to your publishing requirements.
Finally, keep your original design files. Saving editable versions allows you to update text, change promotional details and prepare new image sizes without starting from the beginning.
Frequently Asked Questions
What is the best image size for a Facebook feed post?
A square image measuring 1080 × 1080 pixels is a popular starting point for Facebook feed posts. It uses a 1:1 aspect ratio and works well for product promotions, announcements and general business content.
What size should a Facebook cover photo be?
A commonly referenced Facebook Page cover photo size is 820 × 312 pixels. However, the visible area may differ between desktop and mobile displays. Keep important design elements within a central safe area and preview the result on different devices.
What is the best size for Facebook Stories?
A vertical image measuring 1080 × 1920 pixels is a practical starting point for Facebook Stories. It uses a 9:16 aspect ratio designed for full-screen mobile viewing.
What size should I use for a Facebook profile picture?
A square image of 320 × 320 pixels or larger is a useful starting point. Remember that profile pictures are commonly displayed inside circular frames, so keep important content near the centre.
Does Facebook reduce image quality after uploading?
Facebook may process uploaded images, and the final appearance can vary depending on the original file, dimensions, format and placement. Preparing an appropriately sized, good-quality image before uploading can help maintain a professional appearance.
Should I compress images before uploading them to Facebook?
Compressing images before uploading can reduce file sizes and make them easier to manage. However, excessive compression can introduce visible artefacts and make text or product details appear blurry. Always compare the compressed image with the original.
Is JPG or PNG better for Facebook posts?
JPEG is generally suitable for photographs and product images. PNG is useful for graphics containing text, logos, sharp edges or transparency. Choose the format that best matches your content and check Facebook’s current upload support.
Can I resize Facebook images without losing quality?
You can often resize images while maintaining good visual quality, especially when reducing a high-resolution original to a smaller size. However, enlarging a small image may reduce sharpness. Use a suitable original image and preview the resized result before publishing.
Can I resize Facebook images for free?
Yes. Online image resizing and compression tools can help you prepare graphics without purchasing professional desktop software. RupaCompress offers image utilities for common image preparation tasks.
Conclusion
Choosing the correct Facebook image dimensions is an important part of creating professional social media content. Whether you are publishing a square feed post, sharing a landscape promotional graphic, preparing a vertical Story or designing a Facebook Page cover photo, the right dimensions help your visuals appear clear and properly framed.
Remember that image preparation involves more than simply changing width and height. You should also consider aspect ratios, cropping, resolution, compression and file formats. Keeping important content within safe areas and checking the final preview can help prevent common publishing problems.
For a more efficient workflow, prepare separate image versions for different Facebook placements and compress them carefully before uploading. If you use online image tools for business or personal photographs, also check how those services process and handle your files.
Ready to prepare your Facebook graphics? Explore the free image tools at RupaCompress.com to crop, resize and compress images for your social media content. Create properly sized visuals, manage image file sizes and prepare your graphics for a more professional Facebook presence.