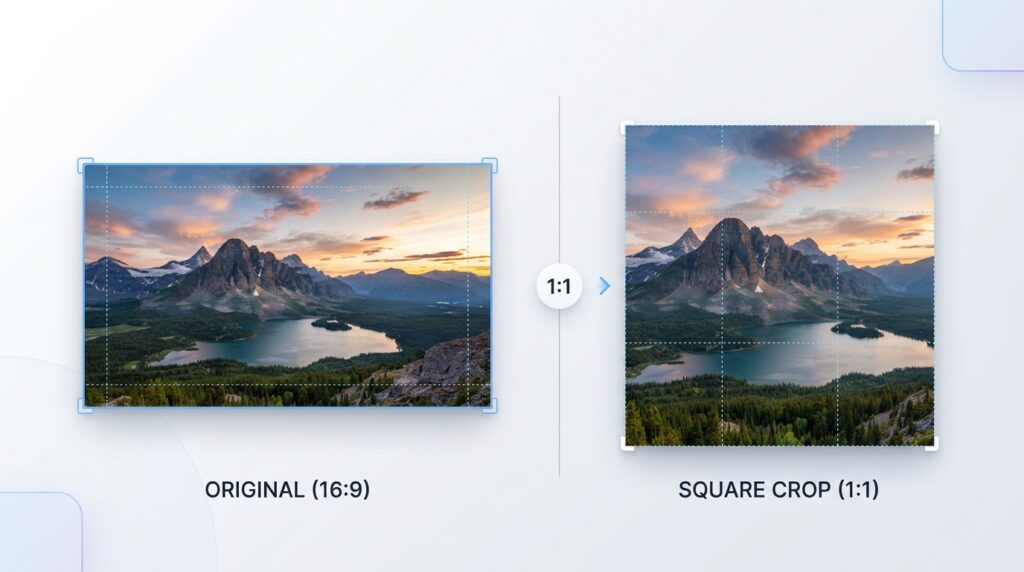
Images appear in many different shapes and sizes, depending on the device used to capture them and the platform where they will be published. A smartphone photograph may be taller than it is wide, a landscape photograph may have a wide horizontal composition, and a screenshot may use a widescreen layout. However, many digital applications display profile images, product thumbnails, avatars, and other visual elements inside square spaces. When a rectangular photograph is placed into a square layout without careful preparation, the result may cut off an important part of the image, leave the subject poorly positioned, or make the composition look unbalanced. Cropping an image to a square gives you more control over how the final picture appears. It allows you to choose which section remains visible, remove distracting areas around the edges, and create a consistent image shape for your website, online store, or social media account. Whether you are preparing a professional profile picture, creating product listings, organizing a photography portfolio, or publishing content for a business, knowing how to crop a photograph correctly can make your images look more polished and consistent.
What Does It Mean to Crop an Image to a Square?
Cropping an image to a square means changing the visible image area so that its width and height are equal. This shape is known as a 1:1 aspect ratio because the horizontal and vertical dimensions have the same proportion. For example, an image measuring 1200 pixels wide and 1200 pixels high is square, just as an image measuring 500 pixels wide and 500 pixels high is square. These images have the same aspect ratio even though they have different pixel dimensions and therefore different levels of detail. The distinction is important because aspect ratio describes the shape of an image, whereas pixel dimensions describe its actual width and height in pixels. A photograph may already have a high resolution but still require cropping because its original shape does not match the shape needed for a particular use.
Cropping works by removing unwanted parts of the image, usually from its edges. If you have a wide photograph, making it square will generally require removing content from the left and right sides, unless you choose a different framing or use a square canvas with a background. If you have a tall portrait photograph, making it square usually involves removing content from the top, bottom, or both, depending on the selected crop area. A crop does not normally stretch the subject to change its proportions. Instead, it removes the pixels outside the selected area while preserving the proportions of the content that remains. This is why choosing the crop position carefully is essential. A poorly positioned crop may remove someone’s head, cut off a product, or exclude a detail that was important to the original photograph. A thoughtfully positioned crop keeps the main subject clear and gives the final image a balanced appearance.
Why Square Images Are Useful
Square images are useful because they fit naturally into many digital layouts. Social media profiles, user avatars, product grids, portfolio thumbnails, and contact images frequently use a square source image or display an uploaded image inside a square or circular frame. Preparing your image in advance lets you control the composition before the platform applies its own display rules. For example, a rectangular portrait that looks perfect in your phone’s gallery may be cropped automatically when uploaded as a profile picture. If the platform centres the crop on the wrong area, the resulting image may cut off the top of your head or leave your face positioned awkwardly. By preparing a square version first, you can decide how much space to leave around your face and ensure that the important details remain visible.
Square crops are also valuable for online businesses. Product images in an online catalogue often need consistent framing so that customers can compare items easily. If one product appears extremely close to the camera while another occupies only a small portion of its image, the catalogue can look uneven even when the photographs themselves are good. Cropping product photographs to a consistent shape and aligning the main objects can improve the overall appearance of the product grid. The same principle applies to team profiles on corporate websites, restaurant menu thumbnails, service listings, and photography portfolios. Consistency does not mean every image must be cropped identically. Different subjects may require different positioning, but using the same aspect ratio and maintaining a similar visual scale can help create a more organized presentation.
How to Crop a Photo to a Square Online
One of the easiest ways to create a square image is to use an online cropping tool that supports a 1:1 aspect ratio. Begin by selecting the original photograph you want to edit. Whenever possible, work from the highest-quality original available instead of a small image downloaded from a social network or messaging application, because the original usually contains more detail. Open the RupaaCompress Crop Image tool and add your image to the workspace. The tool supports common image formats, including JPG, PNG, and WebP, as well as other supported formats depending on browser compatibility. Once the image is loaded, choose the square aspect ratio option. This establishes equal width and height for the crop, allowing you to concentrate on the framing rather than estimating the dimensions manually.
After selecting the 1:1 ratio, position the crop so that the most important part of the photograph remains visible. For a portrait, check the position of the face, hair, shoulders, and any other details that contribute to the composition. For a product photograph, keep the complete product visible whenever possible and avoid cutting off handles, edges, labels, or accessories. For landscape or travel images, decide which visual element should attract attention and use the crop to reduce distracting areas around it. A square crop does not have to place the subject directly in the centre in every situation. Sometimes, moving the subject slightly toward one side creates a more natural composition and leaves useful breathing room around it. RupaaCompress provides a nine-position control that lets you choose which part of the photograph to preserve, helping you adjust the crop when the centre of the image is not the best choice.
Before applying the final crop, inspect all four edges. A crop can appear correct at first glance but still remove a small detail that becomes noticeable when the image is used on a website or viewed on a larger screen. Check that faces are not too close to the top, that products have enough surrounding space, and that any text or important graphics remain readable. If the image is intended for a profile picture that may be displayed as a circle, leave additional space around the subject because the platform may hide the corners of the square image. When you are satisfied with the framing, process the image and download the resulting file. You can then upload it to your preferred social media platform, website, online marketplace, or other destination without relying entirely on automatic cropping.
Choosing the Right Size for Your Square Image
A square aspect ratio does not automatically mean that an image has the correct pixel dimensions for every use. A square image can be 200 by 200 pixels, 800 by 800 pixels, or 2000 by 2000 pixels, and each of these dimensions may be appropriate for a different purpose. A small avatar may not need the same resolution as a detailed product photograph displayed on an e-commerce website. If an image is too small for its intended display size, it may appear soft or pixelated when enlarged. However, creating an unnecessarily enormous image can increase file size without providing a visible benefit at the final display dimensions. The appropriate size depends on how the image will be displayed, whether viewers need to zoom in, the requirements of the destination platform, and the balance you want between quality and performance.
It is worth distinguishing cropping from resizing. Cropping changes which section of the photograph remains, while resizing changes the pixel dimensions of the image. If you crop a large photograph to a square, the resulting square may still contain more pixels than your website needs. In that situation, you can crop first and then resize the image to a suitable output size. This approach helps you preserve the composition you want before reducing the dimensions. When preparing images for a website, also consider compression after cropping, particularly when the output file is a large photograph. For further optimization, you can use the RupaaCompress image compression tool to reduce file size while checking that the final image still looks good.
Common Mistakes to Avoid When Cropping Square Photos
One common mistake is cropping too tightly around the subject. Although a close crop can work well for some portraits and product details, it can also make the image look cramped or remove useful context. Faces need a reasonable amount of space around them, while product images often benefit from showing the object’s complete shape. Another mistake is allowing the automated centre position to determine the final composition without reviewing the result. The middle of a photograph is not always where the most important subject is located, particularly when the original image was composed using off-centre framing. A third mistake is forcing the image to fit the intended dimensions by stretching it instead of cropping it. Stretching can distort faces, logos, and objects, making them appear wider or narrower than they should. Cropping to the correct aspect ratio preserves the natural proportions of the remaining content.
You should also avoid cropping every photograph in the same way when the subjects have different shapes. A portrait, a tall bottle, a wide electronic device, and a landscape scene may all require square output, but they do not necessarily need identical positioning. The aim should be visual consistency without losing important information. Before saving, check the result at the approximate size where it will actually be displayed. A crop that looks attractive on a large monitor may be difficult to understand as a tiny thumbnail if the main subject occupies too little space. Similarly, an image with small labels or details may require a slightly wider crop to keep those elements recognizable. Taking a few moments to evaluate the final result can prevent unnecessary editing later.
What If You Want a Square Image Without Cutting Anything Off?
Cropping is not always the correct solution when the entire photograph must remain visible. If the original image contains important details near every edge, removing part of it may damage the composition. In that case, consider placing the complete photograph on a square canvas and filling the extra space with a solid colour, a blurred background, or another suitable design element. For example, a wide product photograph can be centred on a square white background so that the whole product remains visible, even though the original image is not square. This is often useful for product listings, branded graphics, and promotional designs. A square canvas with a background changes the overall composition without forcing you to discard the original photograph’s edges.
The right method depends on your priorities. When the main goal is to focus attention on a face, product, or selected area, a square crop is usually effective. When every part of the image needs to remain visible, adding space around the photograph may be a better choice. Whatever method you choose, preserve your original file so that you can create alternative versions for different platforms. A single photograph may need a square profile image, a wide website banner, and a vertical story image, and each version can benefit from its own carefully selected framing. Preparing these versions individually gives you more control over how your content appears across different screen sizes and applications.
Create Square Images Quickly with RupaaCompress
Preparing images for online publishing becomes much easier when you have a simple workflow. Start with a good-quality original, select the correct aspect ratio, position the crop according to the subject, inspect the edges, and choose suitable output dimensions. If you are preparing a collection of similar photographs, applying consistent crop settings can save time and create a more professional-looking gallery. The RupaaCompress Crop Image tool supports exact dimensions, standard aspect ratios, position controls, and batch processing, allowing multiple images to be handled in one workflow. According to the website, cropping takes place in the browser without uploading image files to a remote server, which is useful for people who want to work with personal photographs or business images locally.
Square cropping is a small editing task that can have a significant effect on the way your photographs are presented. A carefully chosen crop helps profile pictures look balanced, product images look consistent, and social media content appear more intentional. Rather than allowing a platform to decide what should be removed from your photograph, take control of the framing yourself. Visit the RupaaCompress Crop Image tool to prepare square images for your next profile update, online store, website, or creative project.