Every time you upload a photo, illustration, or screenshot to your website, two very different audiences interact with it. The first audience consists of sighted human visitors who immediately understand the visual context, colors, and subject matter of the picture. The second audience consists of screen readers, assistive technologies, and search engine crawlers none of which can “see” pixels the way a human eye does.
To bridge the gap between visual media and text-based technologies, the web relies on a simple HTML attribute known as image alt text (alternative text).
Despite taking less than thirty seconds to write, alt text is one of the most frequently overlooked elements in web publishing. Leaving it blank locks out visually impaired users and strips your website of valuable organic traffic from Google Images. On the other hand, stuffing it with awkward keywords can trigger search engine spam filters and create a frustrating experience for assistive technology users.
In this complete guide, we will break down exactly what image alt text is, why it is essential for both web accessibility and search engine optimization (SEO), how to prepare your image files before uploading them, and how to write clear, effective alt descriptions for any scenario.
What Is Image Alt Text?
Alt text (short for alternative text, also referred to as “alt attributes” or “alt descriptions”) is a short written description added to an image’s HTML tag on a webpage.
In raw HTML code, an image with alt text looks like this:
<img src="image-compressor.jpg" alt="A person using an online image compressor on a laptop at a wooden desk">
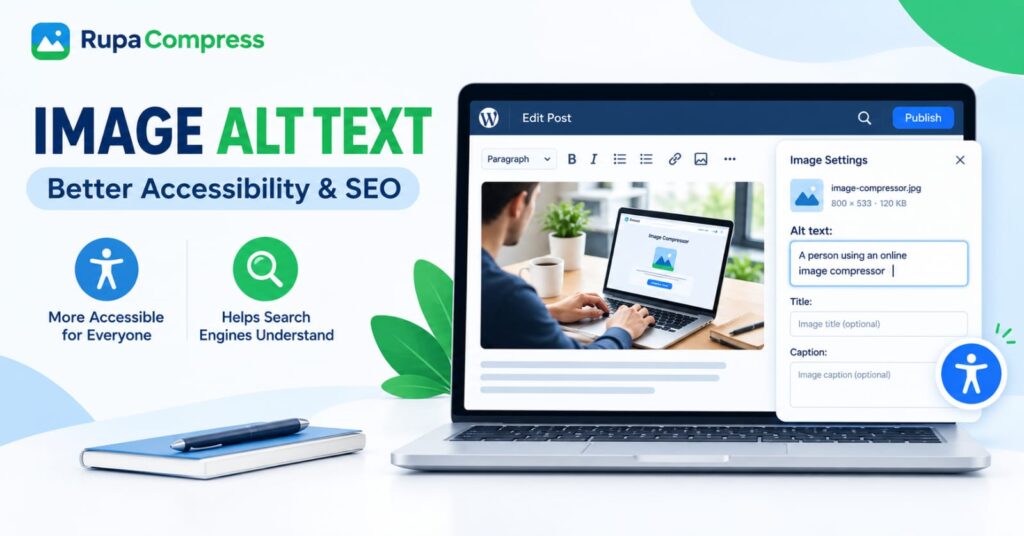
Most modern content management systems (CMS) like WordPress, Shopify, Wix, and Squarespace do not require you to touch raw HTML. Instead, when you click on an image in your post editor, an Image Settings panel opens on the side of your screen with a dedicated box labeled Alt text. Whatever you type into that box is automatically inserted into the HTML alt attribute when your page is published.
Alt text serves three distinct technical functions on a live website:
- Screen Reader Narration: When a blind or visually impaired visitor navigates a webpage using a screen reader (such as NVDA, JAWS, or Apple VoiceOver), the software reads the alt text aloud so the user knows what the image communicates.
- Broken Image Fallback: If a user has a weak cellular connection, disables images to save mobile data, or if the image file fails to load properly, the browser displays the alt text inside the empty image container so the context of the page isn’t lost.
- Search Engine Indexing: Search engine bots use the alt attribute alongside surrounding page text and filenames to understand what an image depicts and which search queries it should rank for.
Why Image Alt Text Matters: The Dual Benefit
Adding alt text isn’t just about checking a box in an SEO plugin like Rank Math or Yoast. It directly serves two foundational pillars of modern web publishing: making the internet usable for everyone and making your content discoverable.
1. Making the Web Accessible for Everyone
Web accessibility (often abbreviated as a11y) is the practice of ensuring that websites can be navigated and understood by people of all abilities. Millions of internet users rely on screen readers or refreshable Braille displays due to blindness, low vision, or neurodivergent reading preferences.
When a screen reader encounters an image on a page, it looks straight for the alt attribute:
- With helpful alt text: The screen reader smoothly announces, “Image: A person using an online image compressor,” allowing the listener to follow the tutorial or story without missing a beat.
- With missing alt text: Worse than saying nothing, many screen readers fall back to reading the raw filename aloud. Imagine listening to an article and suddenly hearing, “Image: WhatsApp-Image-2026-10-20-at-9-38-12-PM-final-v2.jpg.” It completely derails the user’s focus.
Furthermore, web accessibility is increasingly a legal requirement under international frameworks such as the Web Content Accessibility Guidelines (WCAG), the Americans with Disabilities Act (ADA), and the European Accessibility Act (EAA). Providing accurate text alternatives for non-text content is the very first success criterion in the WCAG standards.
2. Helping Search Engines Understand Your Content
While computer vision and AI image recognition have advanced rapidly, search engine crawlers still rely heavily on explicit text signals to interpret context, intent, and nuance.
Consider a photo of a laptop sitting on a desk showing a web application. Without text signals, a crawler might simply categorize the photo as “person typing on laptop.” By adding specific alt text—such as “A person using an online image compressor to reduce JPG file size”—you tell Google the exact software utility being demonstrated.
This clarity powers two major SEO advantages:
- Google Images Traffic: Google Images represents a massive share of global search queries. Shoppers looking for products, designers looking for layouts, and students looking for diagrams frequently click straight from the “Images” tab to the host website.
- Topical Authority: Well-written alt text reinforces the semantic relevance of the entire article. When your headings, body paragraphs, image filenames, and alt attributes all align naturally around a topic, search engines gain higher confidence in your page’s quality.
Alt Text vs. Image Title vs. Caption: What’s the Difference?
When you open the Image Settings panel in WordPress or your Media Library, you will notice several text fields stacked right below one another: Alt text, Title, and Caption. Because they sit in the same menu, many website owners mistakenly copy and paste the exact same sentence into all three boxes.
Each field has a distinct job and should be treated differently:
Alt Text (Essential)
- Who sees it: Screen readers, search engine bots, and users whose browsers fail to load the image. It is hidden from regular visual view on a properly loaded page.
- Purpose: To describe the literal visual content and function of the image for someone who cannot see it.
- Should you fill it out? Yes, on every meaningful image (except purely decorative shapes or dividers).
Image Title (Optional)
- Who sees it: Almost no one on modern devices. Historically, desktop browsers displayed the
titleattribute as a small tooltip when a user hovered their mouse cursor over an image for a few seconds. Mobile and tablet users cannot hover, and most screen readers ignore the title attribute by default. - Purpose: Internal media library organization in WordPress or minor supplementary hover notes.
- Should you fill it out? It is completely optional. Leave it blank on the front end or use a clean, human-readable label in your media library so you can search for the file later. Never duplicate your alt text into the title attribute, as some assistive tools may read both aloud, creating an annoying echo.
Image Caption (Optional)
- Who sees it: Every visitor on the page. Captions are rendered as visible text directly underneath the image inside your article layout.
- Purpose: To provide extra context, editorial commentary, photo credits, or takeaways that aren’t immediately obvious just by looking at the picture.
- Should you fill it out? Only when the visible audience needs extra explanation.
- Example: If your alt text says, “Comparison chart showing a 2.8 MB JPG reduced to a 320 KB WebP file,” your visible caption underneath might say, “Switching from uncompressed JPGs to compressed WebP files cut our homepage load time in half.” Notice how the two complement each other without repeating the exact same words!
The Pre-Upload Checklist: Complete Image SEO Starts Before Alt Text
Writing world-class alt text won’t save your SEO if the image file itself weighs 4 MB, breaks your layout, or leaks private metadata. Notice how in the WordPress editor example at the top of this page, the uploaded file is named image-compressor.jpg, scaled to 800 × 533 pixels, and compressed down to a lean 120 KB before the author even types the alt text.
Before you drag an image into WordPress and fill out the alt text field, run it through this rapid four-step pre-upload pipeline using the free browser tools on RupaaCompress:
1. Crop and Resize to Match Your Layout
Uploading a 4000-pixel-wide camera photo into an 800-pixel blog column wastes bandwidth and destroys your Core Web Vitals score. Use the Resize Image tool on RupaaCompress to scale your image to the exact pixel width of your content container (such as 800 × 533 or 1200 × 675), or use our Crop to Square guide for uniform product thumbnails and profile grids.
2. Convert to a Web-Friendly Format
Raw iPhone photos (HEIC) or heavy uncompressed PNG screenshots bog down mobile browsers. Convert your files into modern WebP format or optimized JPG using the Convert Image tool. If you aren’t sure which extension fits your specific graphic, check our breakdown of the best image format for websites in 2026.
3. Compress the File Size
Once your dimensions and format are set, drop your batch into the Compress Image tool. Aim to keep standard blog graphics between 50 KB and 150 KB (just like the 120 KB file shown in our WordPress example). If you are dealing with strict portal limits or heavy galleries, follow our step-by-step tutorial on how to compress images to 100 KB or less without making text or details blurry. Plus, because RupaaCompress processes everything locally in your browser, it simultaneously helps you remove hidden EXIF data from photos without uploading private drafts to a third-party server.
4. Rename the File Descriptively
Never upload files named DSC_00492.jpg or Screenshot-2026-10-20.png. Search engines read filenames as their very first clue about an image’s subject. Rename your file using lowercase letters and hyphens to separate words—such as image-compressor.jpg or wordpress-image-alt-text-settings.webp— using the batch rename templates right inside RupaaCompress before downloading your ZIP archive.
Step-by-Step: How to Write Great Image Alt Text (With Examples)
Writing effective alt text doesn’t require a degree in copywriting. Imagine you are on a phone call with a friend and need to explain a picture in one clear sentence so they understand why it’s included in the article.
Follow these six practical rules to write clean, high-ranking alt text every time:
Rule 1: Be Specific and Concise (Aim for Under 125 Characters)
Most screen readers pause or cut off contiguous alt descriptions around 125 characters, and long paragraphs inside an alt tag are tiring to listen to. Get straight to the point by describing the core subject, action, and relevant setting.
Let’s look at the workspace photo inside our WordPress editor illustration:
- Bad (Missing):
alt="" - Bad (Filename pasted):
alt="image-compressor.jpg" - Bad (Keyword stuffing):
alt="image compressor free image compressor online compress jpg png webp best image optimization tool" - Okay (Too vague):
alt="Man on laptop" - Good (Clear and natural):
alt="A person using an online image compressor on a laptop at a wooden desk"
Rule 2: Never Start With “Image of…” or “Picture of…”
Screen readers automatically announce that an element is an image before reading the alt text. If you write “Image of a golden retriever puppy,” the screen reader will say aloud: “Image: Image of a golden retriever puppy.”
Skip the redundant intro. Instead of writing “Picture of…”, jump straight to the subject—or, if the medium itself is important to the context, specify the type of visual at the end or beginning, such as “Screenshot of the WordPress Image Settings panel” or “Bar chart comparing JPG and WebP file sizes.”
Rule 3: Match the Context of the Surrounding Article
The best alt text for the exact same photograph changes depending on what the article is actually about.
Imagine you have a photo of a woman sipping espresso at a sidewalk café in Paris:
- On a travel blog about Paris neighborhoods:
alt="Woman drinking espresso at an outdoor café table in Montmartre, Paris" - On an e-commerce store selling the sunglasses she is wearing:
alt="Woman wearing tortoiseshell polarized aviator sunglasses outdoors" - On a photography blog teaching depth-of-field:
alt="Portrait shot at f/1.8 showing a sharp subject at a café with a softly blurred street background"
Always ask yourself: Why did I put this specific image in this specific paragraph? Describe the detail that proves your point.
Rule 4: Transcribe Essential Text Shown Inside Infographics and Screenshots
If you upload a screenshot, banner, or diagram that contains important words, your alt text should convey the core message of those words. Remember that screen readers cannot read text that is flattened into pixels inside a .jpg or .webp file.
- Weak:
alt="Infographic about slow websites" - Strong:
alt="Comparison graphic showing a 2.8 MB JPG causing slow page loading versus a compressed 320 KB JPG enabling fast loading"
Rule 5: Include Your Target Keyword Only When It Fits Naturally
If an image genuinely illustrates your primary or secondary keyword, include it naturally in the description. In our WordPress example, the phrase “online image compressor” describes the literal screen shown on the laptop while naturally incorporating a valuable search term.
However, if you include a stock photo of a smiling customer support representative on a contact page, do not force unrelated SEO keywords into that photo’s alt tag. Accuracy always comes first.
Rule 6: Leave Alt Text Blank (alt="") for Purely Decorative Images
Not every graphic on a webpage carries information. Wavy background shapes, ornamental section dividers, abstract background gradients, or decorative icons placed right next to text labels that already say the exact same thing do not need descriptions.
If you add alt text like “Blue wavy decorative line” to ten section dividers on your page, a blind visitor has to listen to that useless description ten times while trying to read your article. By leaving the Alt Text field completely empty in WordPress, the CMS outputs an empty attribute (alt=""), which instructs screen readers to silently skip the decorative graphic.
How to Add Alt Text in WordPress (2 Simple Methods)
Since WordPress powers over 40% of the web—and integrates seamlessly with SEO plugins like Rank Math—here are the two ways to add and manage your alt text properly.
Method 1: Directly Inside the Block Editor (Gutenberg)
This is the best method because it lets you write alt text tailored to the exact context of the post you are writing:
- Open your post or page in the WordPress editor (
Edit Post). - Click on the Image block you just inserted into your content.
- Open the Settings sidebar on the right side of the screen (click the gear/sidebar icon next to the blue Publish button if it is hidden).
- In the Image Settings panel, locate the Alt text box directly underneath the file preview and dimensions.
- Type your concise, descriptive sentence (for example, “A person using an online image compressor”).
- Click Publish or Update to save your changes.
Method 2: Inside the WordPress Media Library
If you reuse the same product photo, logo, or diagram across multiple pages on your site, you can set a default alt text in your Media Library:
- From your WordPress dashboard, go to Media → Library.
- Click on any uploaded image to open the Attachment Details modal window.
- Fill in the Alternative Text field on the right side.
- Close the window—WordPress saves it automatically. Any new post where you insert this image will automatically pull in this default alt text (though note that changing it in the Media Library will not retroactively update older posts where the image was already inserted into static blocks).
Frequently Asked Questions (FAQs)
1. How long should image alt text be?
Keep your alt text concise—ideally between 5 and 15 words, or under 125 characters. This gives enough room to describe the subject and context accurately without overwhelming screen reader users or diluting your keyword focus.
2. Does adding alt text slow down my website?
Not at all. Alt text is just a few bytes of plain text inside your HTML document. What slows down your website is the actual image file weight. Always compress and resize your images using RupaaCompress before uploading them to your site so your pages stay fast.
3. Should I put periods at the end of my alt text?
Yes, placing a period at the end of your alt text is a great accessibility habit! Even though it isn’t a full paragraph, a closing period causes screen readers to pause briefly and drop their vocal inflection before reading the next heading or sentence on the page, making the audio experience much more natural.
4. What should I write for linked images or buttons?
If an image functions as a clickable link or a button (for example, a magnifying glass icon that submits a search bar, or a company logo in the header that links back to the homepage), your alt text should describe the destination or action, not the visual shape. Write alt="Search" or alt="RupaaCompress Homepage" rather than alt="Blue magnifying glass icon".
5. Can Rank Math SEO automatically generate my alt text?
Rank Math has an “Add Missing ALT Attributes” toggle that automatically inserts the post title or filename into empty alt tags on the front end. While this can act as an emergency fallback for massive legacy blogs, relying on automated post titles is poor practice for accessibility. If a post has eight different screenshots and all eight get the exact same post title injected as their alt text, it confuses both screen reader users and Google Images. Always write unique, accurate alt text manually whenever possible.